Monday, September 26, 2011

Falling For You & Giveaway Winner...

Hello everyone!!  Whew!! Wasn't last week a FUN week!! There were so many fun new products that Lil' Inker Designs Released and a Twinery Blog Hop!  If you are wondering who won the Ultimate Twine Sampler Package from The Twinery, you will find that information at the bottom of this post!! 

Today I want to share another project with the new Lil' Inker Acorn Set and share ANOTHER fun announcement!!  Lil' Inker Designs has a new website!! Yippee!!  If you  would like to check it out, click here!!  And, to celebrate this grand opening, Laura is offering 20% off of the Rainbow & Clouds sets! Just use coupon code "20OFFRC" at checkout!  You can visit the Lil' Inker blog for all the details!


This little acorn is so cute!! Isn't that smiley face so adorable?  The fun thing about this set is that there are several different faces to choose from!  I love that!


Here's a closeup of the acorn's face.  I colored her with my copics.  I thought that it looked like she was sporting a beret too so I added a little twine bow tied with twine from The Twinery to play on that theme.  She is just so cute!


To show that the acorn was falling, I used my sewing machine to stitch some loopy lines.  I also used the Lil' Inker Designs cloud dies (which are ON SALE right now with coupon code "20OFFRC"!!) I love how the perforated lines on the clouds match the lines on the acorn die too!

If you haven't checked out Lil' Inker Designs before, please take time to stop by their new website!! It's great!! You'll also find a link to the blog and to the Flickr gallery so you can find ideas on ways to use your Lil' Inker sets!

Now for those of you who are curious as to who won the Twinery giveaway, your winner is:

Linda Harris!

Yea Linda!! I will send you an email with information on how to claim your prize!  Congratulations!

Thank you to everyone who entered this giveaway!! I had a great time reading all of your comments!

For those of you wondering who won the gift certificates for Lil' Inker Designs, be sure to stop by the store blog today to see if you are a winner!

Thursday, September 22, 2011

Lil' Inker Designs New Release: Acorns

Welcome to the Lil' Inker Designs New Release Blog Hop!  Today is the last day of the hop and you should have come here from the talented Teresa's blog if you are following the hop!

Have you been enjoying the Lil' Inker Designs new release products!!?  Well, wait until you see today's new release!  I love it!!

Introducing Acorns!


You know that wonderful dotted line around the cloud dies that we have all come to love? It's back!! This time it appears on the acorn outline and on the tiny leaf die cut too!! Simply fabulous!! 

AND...one of the GREAT things about this acorn die that sets it apart from other acorn dies, is that the top & bottom of the acorn are separate dies so it is SUPER, SUPER easy to mix & match patterns and colors!! I LOVE this feature so much!!

And this release also includes a super fun and adorable stamp set!! Fun fonts, fun sayings and really FUN faces for the acorns!

I am really excited to share my project with you today!!


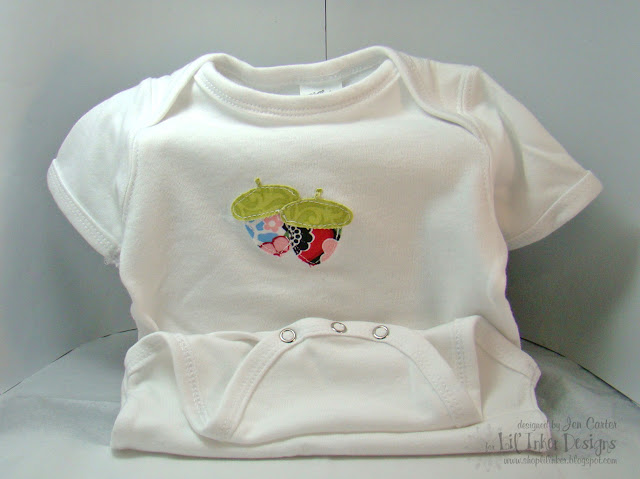
I made a baby gift set using the acorns cut out of fabric.  It looks so adorable and was fairly easy to do!

Let's start with the card.


I cut two acorns out of fabric with my die cut machine.  In order to make the fabric stiff enough to die cut, I used Pellon Craft Fuse Iron-On Backing which adds stability and strength (I got that right off the package, lol!!) to your fabric. It was simple, simple to do. I picked up a 1/4 of a yard in the fabric section of Hobby Lobby. Then, I cut a small square of fabric and backing. Then, you just iron them together. That's it! Very simple! It makes the fabric stiff enough to die cut (although I went over the die in my machine 3 times to make sure it cut through all of the material).


I die cut a front and a back of the acorn.  If you sew two acorns together so that the fabric shows on the back and front of the acorn, you will have to die cut the front of the material for one acorn and then turn the fabric over so that the back side is facing up in your machine and cut the 2nd acorn so that when you put both pieces together they line up.  

After I had the pieces cut, I sewed them about 3/4 of the way together, left the needle in the fabric (but released the foot so I had some give) and took some quilt batting and carefully poked it into the acorns. Once it was completely in and "puffed" up, I continued to sew the acorns closed. (Please ignore the fuzzy edge on my card...not sure how I missed that!!)


For the bag I wanted to create a simple design but yet still allow the acorns to be the star of the show. 


I created these much the same way that I created the acorns on the card, except I didn't "puff" them up with the quilt batting.  I strung them around the handle with The Twinery's twine and before I sewed them together, I taped the twine on with scor-tape and then sewed so that the twine was inside the layers of acorns.


Here is what the acorns look like flipped over.  The nice thing about this is that these can be reused as a decoration or placed on another package!


I adore this onesie!  I wanted these acorns to stay in place while I was sewing them on the onesie, so I die cut some Pellon Wonder-Under which is a transfer web material (it is an adhesive that bonds the fabric diecut to the onesie).  It almost feels like tissue paper and can be purchased in packages or by the yard at stores that sell fabric.  After I die cut this thin paper out, I ironed it onto the back of the acorns, then peeled the paper off the back of the wonder-under and ironed it directly on to the onesie.  This kept the diecuts exactly where I wanted them while I sewed them onto the onesie. 


Here's a closeup.  I'm not a real great sewer, but practice makes perfect right, LOL!!


Here's one more look at the gift set.

There are lots of fabulous projects for you to see on this amazing blog hop!!  Your next stop is to Amy's blog who I am sure has something fabulous up her sleeve!

Don't forget to leave a comment on my blog and on the other designer's blogs along the way for your chance to win one of three $10 gift certificates to the Lil' Inker Designs store!!  I'd LOVE to know if you have ordered or are going to order from Lil' Inker Designs this week!!
Here is the complete blog list order for your hopping pleasure!! 

Jen  ~ You are Here!

Thanks for stopping by!!

Supplies
Lil' Inker Supplies:  Acorn Die, Pinwheel Stamp Set
Other:  Twinery Twine, Fabric from Hobby Lobby, Sweet Blush Cardstock PTI, True Black Ink PTI

Wednesday, September 21, 2011

Lil' Inker Designs: Mini Pinwheel Die

Welcome to another day of the Lil' Inker New Release Blog Hop!!  Hasn't this been fun!?  If you are following along in the blog hop you should have arrived from one of my best friend's blogs, Amy!

Today I get to share the new MINI Pinwheel die!  Lil' Inker Designs already has a fabulous pinwheel die but this new mini die is about 75% of the original size (which means it is 25% smaller than the original die) and is just perfect for cards and projects and is a wonderful compliment to the original!


I wanted to do something with a Halloween theme for today's project but I really don't own anything Halloween (except for a dollar stamp that I bought after this project was completed).  So, I set off to my local Goodwill store to see what I could find to repurpose!  I wasn't sure what I was looking for but knew I would know when I found it and I did!! I found an ugly gold vase container.  It's hard to imagine that it ever looked good new, lol!! I bought it for $1 and took it home and spray painted it black.  Here's the final result:


Not to bad for a repurposing job huh? 

Now look at those adorable pinwheels!! Oh, I loved working with these!  The pinwheel on the card is the original, full-sized pinwheel and the four pinwheels hanging around the vase are all adorable mini-pinwheels.


Aren't these SO stinkin' cute!!  I chose papers for the pinwheels that were Fall/Halloween colors and mixed and matched them.  I think that even without Halloween stamps, I was able to pull off my theme. 


Here is a picture of the bud vase outside of its container.  I filled the vase with Gobstoppers...they are the PERFECT colors for Halloween!


Here's one more look at the candy container.  This is on one of the sides.  I hung the pinwheels with Charcoal twine at alternating lengths around the container and then tied the twine at the top with a button.


The card continues to carry on the theme of the candy container.  I used the same papers, pulling in the black for the card base.  Like I said earlier the pinwheel on this card is the original sized Pinwheel which is also available in the Lil' Inker Designs Shop!  I used the Sentiment Flags Die and stamped a sentiment from the Rainbows & Clouds Stamp Set.


I also used my Champagne VersaMark pad to add glitter to the card front.  Hopefully you can pick that up a little from this photo.  I love how it glimmers in real life!

All of the pinwheel products which includes both sizes of pinwheel dies and the coordinating stamp set will be available for purchase seperately in the Lil' Inker Designs Store!! 

Your next stop on this blog hop is to Teresa's amazing blog!

I will be back tomorrow with ANOTHER fun release!! I can't wait to share with you what I put together!!

There are still three $10 Shopping Sprees up for grabs, so make your way over to the rest of the Design Team blogs to leave comments each day this week. You have through Sunday, September 25th to complete the hop. Winners will be announced on the Lil' Inker Shop Blog on Monday, September 26th.

Here are the rest of the designers that are featuring products with the Mini Pinwheel die today:
Jen (You are Here!)

Supplies
Lil' Inker Designs:  Mini Pinwheel Die, Original Pinwheel Die, Sentiment Flags Die, Rainbow & Clouds Stamp Set
Other:  Charcoal Twine from The Twinery, Cosmo Cricket Snorkel Paper, Lost & Found Paper, PTI Black & Simply Chartreuse Cardstock, PTI Cane Impression Plate, Fiskars Border Die, Brads, PTI True Black Ink, VersaMark Champagne Ink, Buttons

Twinery Blog Hop WITH Giveaway!


Welcome to The Twinery Blog Hop!!  If you would like inspiration for ways to use your twine, then you have come to the right place!! This hop is sure to get your mind spinning with lots of fabulous ideas!  You can follow along in the blog hop today through Friday as a different group of twinery design team members will be featured each day!  If you are following The Twinery's hop from the beginning, you should have come here from Grace's blog!

And, guess what!  I have a Twinery Ultimate Sampler Pack to giveaway, compliments of The Twinery!! How COOL is that!! I will randomly pick one comment from THIS blog post to win this fabulous prize valued at $25!  You have until Sunday, September 25th at Midnight CST to leave me a comment.  I will announce a winner on Monday, September 26th!


For this hop, I wanted to create projects with a Fall theme in mind.


The Twinery's Mandarin twine is a gorgeous orange for Fall themed projects!!  I thought it would make a perfect Fall leaf!  And the Lemondrop twine is a perfect compliment!


To make this leaf focal point, I traced a die cut shape onto my cardstock and used a knife to cut out the leaf shape.  Then, I took a separate piece of cardstock and covered it with adhesive (I used my ATG gun to do this).  Then, I began laying the twine on top vertically until it was covered.  Then, I adhered the two pieces together. 


The Twinery has an Autumn pack of twine in the store all bundled up and ready to come to your home!! You can see all the details here!  Isn't it beautiful?  :)

I also created another card, this one is super, super simple!


My Walmart now has a $1 section in the craft aisle and I found these fun shaped Halloween cards.  I thought that they were too cute to pass up!  I made a rosette flower and punched 3 holes in it and then strung Charcoal twine through the centers to make it into a spider's web.


I made a tiny hole for the twine to be thread through so that when you open the card you see this....

...a little dangling spider with googly eyes!  The twine is the perfect webbing for the spider!


The little yellow moon was added to cover the rosette web from the front.  I kept the inside fairly simple but you could decorate it up to your heart's content!

Thank you so much for visiting my blog today!! I hope you were inspired!  Be sure to visit Hera's blog next, she's the next stop on today's blog hop! And in case you started in the middle or got lost along the way, here are the other design team members participanting in today's blog hop!

Jen Carter (You are here!)
Don't forget to comment on my post to be eligible to win the Ultimate Sampler Pack.  There are many other designers with a giveaway on their blog as well so you have LOTS of opportunities to win!!  And be sure to check out The Twinery's blog Thursday and Friday as well as a new group of design team members will be hopping and many will have prizes at their blogs as well!!

Supplies
Autumn Blessings Card
Twinery:  Mandarin & Lemondrop Twine
Other:  Lil' Inker Designs Sentiment Flags Die, My Mind's Eye Out of the Blue Cardstock, PTI Distressed Dots Paper, PTI Ripe Avacado, White & Kraft Cardstock, PTI Notebook Die, PTI It's Official Stamp Set & Autumn Acorns Stamp Set, Rhinestones

Yikes! Card
Twinery:  Charcoal Twine
Other:  Yikes Card Walmart, Basic Grey Ballot paper, Black button, Walmart $1 Stamp (spider & boo), Papertrey Ink Bitty Box Basics Paper, googly eyes

Sunday, September 18, 2011

Lil' Inker Designs New Release #1

Oh my, oh my!! Are you in for a fun-filled week full of COOL new products from Lil' Inker Designs!!   Each day the design team will be sharing projects with you featuring one or more of the new dies and/or stamp sets that will be released this week.  On this hop, you should have come from my good friend Amy's blog!

Today and tomorrow the design team will be sharing the new Fringe Flower die!  This die is so much fun!! I have made so many flowers with this die and have cut so many different types of products with this die that I had a hard time narrowing down what to share with you today!  Want to see what it looks like?


There are prizes up for grabs too!!  You can win one of THREE $10 Shopping Sprees to the Lil' Inker Designs store just by leaving comments on the blog posts each day!  You have until Sunday, September 25th to comment and the winners will be announced on the Lil' Inker Designs Shop Blog on Monday, September 26th.

Now for the projects!

This first project speaks to my Kansas heart. :)  You can't drive down the roads without seeing wild sunflowers everywhere!  I LOVE seeing them!  They are just so beautiful!


I went with a very earthy, natural feel for this card and made three sunflowers.  It is so easy to make these flowers with more than one color and I've prepared a short tutorial below to show you how to do it!  It is also easy to make the flowers smaller or larger depending on what size you'd like them to be.  Just add more or less felt and you're ready to go!


First cut two pieces of felt from the colors you want your flower to be and fold each piece in half as shown.  Since I wanted the inside to be brown, I cut off 4 "fringes" from the brown die cut.  I attached the brown felt to the yellow felt by placing a 1/8" piece of scor-tape on both sides of the felt to hold it together. 


Second, I took the paper backing off the scor-tape from the first step and then applied a second piece of scor-tape over the entire piece of felt.  This helped to stabalize the two pieces together too.


Third, remove the paper from the scor-tape and start rolling your flower, beginning with your center color first.


The last step is to secure the flower ends down.  I found that using a little bit of hot glue worked the best to hold the ends in place. 

Here's a closeup of the finished flowers.  I "poofed" the flowers out a little by carefully spreading the petals out.

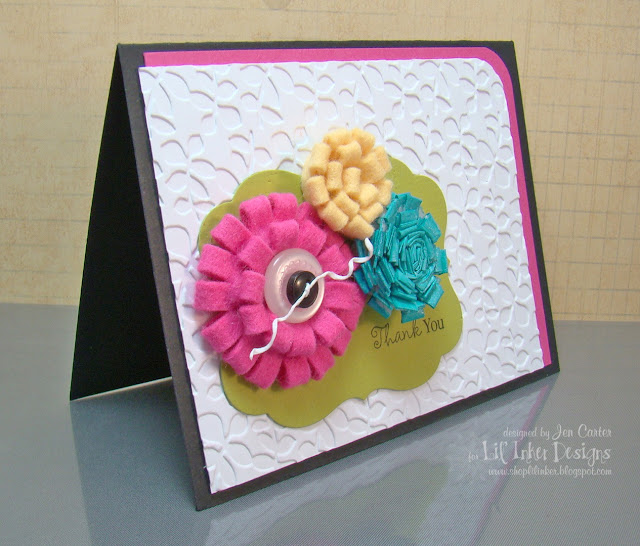
For my next project I wanted to share another card that I made using several different types of flowers made from this same die.


There are so many ways to make different looking flowers from this one die!! I love the versatility of it! 


The pink flower is my favorite of this grouping and it is really easy to make!  It measures approximately 2 inches in diameter.  I put together another quick tutorial on how to make it that you will find below.  The yellow flower is just a smaller version of the regular fringed flower.  I cut off a small piece from the die cut felt and rolled it.  The turquoise flower is cut from several layers of white tissue paper (probably 6 or 7 layers that I cut all at the same time).  I kept the layers together and rolled them and then used scor-tape to keep the ends together.  After it was rolled I sprayed it with turquoise glimmer mist several times to get a good coat.  When that was dry I also sprayed it with a clear sparkly glimmer mist.  I think it has s fun, full look to it!

Here is the tutorial on how to make the felt flower shown in the card:


Cut one length of felt from the Fringed die and one 1 1/2 inch circle from felt.


Put hot glue around the edge of your circle and begin adhering the fringes to the glue.


Here is what it looks like when you have finished going around once.


Cut off the excess fringe and apply another layer of hot glue to the inside of the circle.


Attach a second layer of the fringe.  At this point you only have a piece left with about 4 or so fringes on it.  You can attach a button to the center like I did for my card above or you can cut another piece of felt and add one to two more layers to your flower.


Here is a flower with 3 layers added.


Here is a flower with 4 layers.


Here are 2 finished flowers.  The pink flower has four layers of fringes and the purple flower I chose to  add three layers and then glue a button to the center.

Here is a look at my finished card again.

Thank you so much for visiting today!! I hope I didn't tutorial you out!! :)  I think you will LOVE this new die!! It makes creating these flowers a cinch!  I can't wait to share more with you at a later date!! I will have another post on Thursday & Friday of this week with more Sneak Peeks of Lil' Inker Designs New products!!  If you would like to purchase the Flower Fringe die, it is available NOW in the Lil' Inker Designs store, so be sure to head on over and grab yours!

Make sure to visit ALL the participating designers today and be sure to leave a comment on each blog for a chance to win!!

Your next stop on the hop is the Lil' Inker Designs Shop!! 

In case you didn't start at the beginning of the hop, here is a complete list of all participating designers (there will be another group of designers posting more projects using this die tomorrow, so be sure to visit the Lil' Inker Designs blog tomorrow as well!

Jen  You are Here!!


Supplies
Sunflower Card
Lil' Inker Designs:  Fringed Flower Die, Sentiment Flags Stamp Set
Other:  Twinery Twine, My Mind's Eye Patterned Paper, Linen Impression Plate PTI, felt (Felt on the Fly Etsy Store & Hobby Lobby brown), Red Burlap, PTI Dark Chocolate Ink

Thank You Card
Lil' Inker Designs: Fringed Flower Die, Pinwheels Stamp Set
Other:  Raspberry & Harvest Gold Felt PTI, Tissue Paper, Country Foliage Sizzix Embossing Folder, PTI Linen Impression Plate, Raspberry Fizz, White, Black & Simply Chartreuse PTI Cardstock, Buttons, Scrapper's Floss, Corner Chomper, Glimmer Mist


Monday, September 12, 2011

Give Thanks

I have a unique card to share with you today that was based on a picture I found on Pinterest.  Here is the inspiration photo.


And this is the card I made using that as inspiration.


I die cut the leaves from the PTI Autumn Acorns set and then stamped the image from the stamp set with Haystack Palette ink.  I then adhered just the centers of the die cuts with adhesive and curled up each edge.  I went with a Hawaiian Shores leaf focal point rather then the red because I really like the contrast it added, but there is a Scarlet Jewel leaf underneath.

The leaf that the sentiment was stamped on (LOVE, LOVE the fonts in this set so much!!) was also impressed with the woodgrain impression plate as was the back panel of the card that the leaves are attached to.


I stitched down the center of this leaf to give it some texture.


The card has a unique look to it I think and was very simple to put together!

And some really exciting news!! Lil' Inker Designs is getting ready to introduce some FUN new products! Join us the week of September 19 - 23 as the design team shows off these new products! Let me tell you, they are fun, fun!!


 We are headed to the Kansas State Fair this afternoon for fun with family and friends.  We usually only go once a year even though we are within 15 minutes of it.  Wouldn't you know that while we have been enjoying temps in the 70's and 80's that tomorrow it is suppose to be in the 90's (and then nice the rest of the week!)!  Of course!! It is either usually HOT or rainy on the day we go each year (which is usually dollar day!). 

Thank you for stopping by today!! Hope you enjoy your day!

Supplies (all PTI unless noted)
Stamps: Autumn Acorns
Paper: Kraft, Hawaiian Shores, Scarlet Jewel
Ink: Palette Haystack, L'amore Red & VersaMark
Other: Woodgrain Impression Plate, Autumn Acorn Dies
Related Posts Plugin for WordPress, Blogger...